
David Schmitz
CTO
This post explores Terraform from a beginner’s perspective. We’ll look at the problem Terraform solves and what it’s distinct features are.
By using some rather simple examples we’ll get a good feeling of how to use it in real life. We will build a running EC2 instance, based on a LAMP stack.
This post covers the simple version, a follow up will show the advanced configuration using Consul for state synchronization and Ansible for configuration management.
The examples focus on AWS, so you may need an account to follow along. I’ll use free-tier resources only, so even a demo account is enough.
Note: I am neither a Terraform nor an AWS expert…so take everything with a grain of salt 😉
What is Terraform and why should I care?
Terraform is an open source tool from Hashicorp (of Vagrant fame).
It takes care of codifying your infrastructure.
That means, instead of clicking around in the AWS console, you write configuration files. The files are pure text, thus can be shared, versioned, peer reviewed same as any code.
Basically, Terraform is a tool that helps you with achieving Infrastructure as Code (IaC).
Installing Terraform
We’ll install Terraform and run a simple demo, to make things clear.
Installing Terraform is extra easy.
Download the appropriate Zip from https://www.terraform.io/downloads.html. Unzip the file and put the terraform binary to some place on your PATH.
Run this command to check if everything is working:
$ terraform -v
The output should resemble
Your version of Terraform is out of date! The latest version
is 0.9.3. You can update by downloading from www.terraform.io
Create a simple file with the following content:
provider "aws" {
  region = "eu-west-1"
}
resource "aws_instance" "simple" {
  instance_type = "t2.micro"
  ami = "ami-a8d2d7ce"
}
Here we are basically saying, that we want to use [AWS] as our cloud provider. Terraform is mostly cross provider capable. This means, you can easily configure your landscape across AWS, Heruko, Azure, whatever.
As mentioned above, I’ll keep to AWS in this post.
In addition a resource is being created. In this case a new EC2 aws_instance. We refer to this resource by its name simple. E.g. ${aws_instance.simple.ami} refers to "ami-a8d2d7ce". This will come in handy later.
The instance type is t2.micro, part of the free tier.
The AMI defines the image, that is used for creating the instance.
Run this command to validate your configuration:
$ terraform plan
plan basically dry-runs your configuration.
This allows you to check in advance, what is going to happen.
Then apply the configuration to actually create the resources.
$ terraform apply
The output will tell you what actually was created by Terraform.
aws_instance.simple: Creating...
  ami:                         "" => "ami-a8d2d7ce"
  associate_public_ip_address: "" => "<computed>"
  availability_zone:           "" => "<computed>"
  ebs_block_device.#:          "" => "<computed>"
  ephemeral_block_device.#:    "" => "<computed>"
  instance_state:              "" => "<computed>"
  instance_type:               "" => "t2.micro"
  ipv6_addresses.#:            "" => "<computed>"
  key_name:                    "" => "<computed>"
  network_interface_id:        "" => "<computed>"
  placement_group:             "" => "<computed>"
  private_dns:                 "" => "<computed>"
  private_ip:                  "" => "<computed>"
  public_dns:                  "" => "<computed>"
  public_ip:                   "" => "<computed>"
  root_block_device.#:         "" => "<computed>"
  security_groups.#:           "" => "<computed>"
  source_dest_check:           "" => "true"
  subnet_id:                   "" => "<computed>"
  tenancy:                     "" => "<computed>"
  vpc_security_group_ids.#:    "" => "<computed>"
aws_instance.simple: Still creating... (10s elapsed)
aws_instance.simple: Creation complete (ID: i-0df9487a7eb151059)
Apply complete! Resources: 1 added, 0 changed, 0 destroyed.
The state of your infrastructure has been saved to the path
below. This state is required to modify and destroy your
infrastructure, so keep it safe. To inspect the complete state
use the `terraform show` command.
State path:
As expected a new instance based on our AMI and type is created.
Other settings are computed, based on defaults or external configuration.
Note the little thing about To inspect the complete state use the "terraform show" command..
Just do that now.
This will tell you everything, that was created and configured on behalf of you configuration (some lines removed, for sake of readability):
$ terraform show
aws_instance.simple:
  id = i-0df9487a7eb151059
  ami = ami-a8d2d7ce
  ... // snip
  instance_state = running
  instance_type = t2.micro
  ... // snip
  public_dns = ec2-54-72-243-229.eu-west-1.compute.amazonaws.com
  public_ip = 54.72.243.229
  ... // snip
  tags.% = 0
  tenancy = default
  vpc_security_group_ids.# = 1
Obviously, things will look different for you.
If you look closely, you will notice a file terraform.tfstate that has been created.
We’ll come back to that later, when we talk about state.
For now just be aware, that this file is used by Terraform to know how to update a certain cloud configuration…so do not delete it! Otherwise you have to clean it up yourself.
Because we like things to be clean and proper, let’s destroy the created instance
$ terraform destroy
Do you really want to destroy?
  Terraform will delete all your managed infrastructure.
  There is no undo. Only 'yes' will be accepted to confirm.
  Enter a value:
Answer with yes and Terraform will remove everything it has created.
aws_instance.simple: Refreshing state... (ID: i-0df9487a7eb151059)
aws_instance.simple: Destroying... (ID: i-0df9487a7eb151059)
aws_instance.simple: Still destroying... (ID: i-0df9487a7eb151059, 10s elapsed)
aws_instance.simple: Still destroying... (ID: i-0df9487a7eb151059, 20s elapsed)
aws_instance.simple: Still destroying... (ID: i-0df9487a7eb151059, 30s elapsed)
aws_instance.simple: Still destroying... (ID: i-0df9487a7eb151059, 40s elapsed)
aws_instance.simple: Still destroying... (ID: i-0df9487a7eb151059, 50s elapsed)
aws_instance.simple: Still destroying... (ID: i-0df9487a7eb151059, 1m0s elapsed)
aws_instance.simple: Destruction complete
Destroy complete! Resources: 1 destroyed.
Sidenote: What if things go wrong?
By setting the log level via TF_LOG you can get a detailled view of Terraform’s behaviour.
$ TF_LOG=TRACE terraform apply
But wait…how does Terraform know my credentials
You can define you credentials explicitly using environment variables or configuration parameters like
provider "aws" {
  access_key = "myaccess"
  secret_key = "mysecret"
}
If you do not provide these values, then Terraform falls back to using the values in .aws/credentials.
With this simple example behind us, we’ll jump directly into a more complex, realistic scenario.
Going enterprise
We’ll now build on the basic example.
Our case will be build in two stages:
Stage 1 will just be a simple instance, running a LAMP stack.
Stage 2 will be more complex, tackling state with Consul and provisioning using Ansible. This will be part of the next post.
Building stage 1 means setting up a Linux box and installing LAMP. Finally, we’ll modify the index page, such that the standard ‘Hello World’ is displayed.
Creating the EC2 instance
The starting point is the declaration of the provider
provider "aws" {
  region = "eu-west-1"
}
Now we’ll add the EC2 instance
resource "aws_instance" "stage1" {
  instance_type = "t2.micro"
  ami = "ami-a8d2d7ce"
  tags {
    Name = "stage1"
  }
}
This should look familiar.
I have added a tags section, that allows us to add metadata to created resources.
Let’s run this to check if things work as expected.
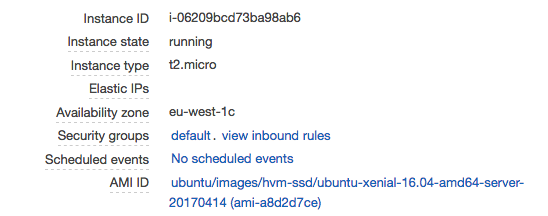
If you switch to the AWS console and browse the EC2 instances, you will find something like this:

The instance’s details are exactly as expected.
Find the Gist for this step at https://gist.github.com/koenighotze/fdb630f548f43f3d9c06de4be8e40b1b
Adding SSH connectivity
Obviously, that thing is boring and not really accessible without network connection.
In order to allow SSH we define a new security group.
resource "aws_security_group" "stage1-sec-group" {
  name = "Allow SSH"
  ingress {
    from_port = 22
    to_port = 22
    protocol = "tcp"
    cidr_blocks = ["0.0.0.0/0"]
  }
  tags {
    Name = "stage1"
  }
}
We define a new aws_security_group resource called stage1-sec-group.
Once again we add a tag, so we can find things easier.
Currently only a single ingress (incoming rule) is defined.
This rule allows port 22 connections from any address ("0.0.0.0/0").
And then we need to associate our instance to this security group by adding to the instance configuration.
resource "aws_instance" "stage1" {
  # ...
  vpc_security_group_ids = ["${aws_security_group.stage1-sec-group.id}"]
  # ...
}
We refer to the id of the security group using the reference expression ${aws_security_group.stage1-sec-group.id}.
Run again run terraform plan to check what gets created and changed.
$ terraform plan
Refreshing Terraform state in-memory prior to plan...
....
~ aws_instance.stage1
    vpc_security_group_ids.#: "" => "<computed>"
+ aws_security_group.stage1-sec-group
    description:                           "Managed by Terraform"
    egress.#:                              "<computed>"
    ingress.#:                             "1"
    ingress.2541437006.cidr_blocks.#:      "1"
    ingress.2541437006.cidr_blocks.0:      "0.0.0.0/0"
    ingress.2541437006.from_port:          "22"
    ingress.2541437006.ipv6_cidr_blocks.#: "0"
    ingress.2541437006.protocol:           "tcp"
    ingress.2541437006.security_groups.#:  "0"
    ingress.2541437006.self:               "false"
    ingress.2541437006.to_port:            "22"
    name:                                  "Allow SSH"
    owner_id:                              "<computed>"
    tags.%:                                "1"
    tags.Name:                             "stage1"
    vpc_id:                                "<computed>"
Plan: 1 to add, 1 to change, 0 to destroy.
Two things are of note.
First, Terraform tells us that the resource aws_instance.stage1 is going to change. It will get a new attribute vpc_security_group_ids.#.
Second, a new resource aws_security_group.stage1-sec-group is created (note the +). If you examine the output, you will notice the ingress configuration for SSH.
Now apply it and connect to it.
$ terraform apply                     # apply the changed configuration
$ terraform show | grep 'public_id =' # get the public ip
$ ssh ubuntu@<PUBLIC IP>
…and of course it fails, because we need to associate a key with this instance.
I won’t go into public key configuration, so I’ll just assume that you configured a key pair.
Just look at http://docs.aws.amazon.com/cli/latest/reference/ec2/create-key-pair.html and http://docs.aws.amazon.com/cli/latest/userguide/cli-ec2-keypairs.html for details on that topic.
Sidenote: Output the public ip directly
Just add the following fragment at the bottom of the Terraform config and you will be told the public ip directly.
resource "aws_eip" "ip" {
  instance = "${aws_instance.stage1.id}"
}
output "ip" {
  value  = "${aws_eip.ip.public_ip}"
}
Let’s assume you now have a key pair called terraform-test-key.
We need to associate that key pair with our instance.
Add the following line to our EC2 resource:
key_name = "terraform-test-key"
terraform plan will tell you, that it needs to destroy and recreate the instance.
$ terraform plan
Refreshing Terraform state in-memory prior to plan...
...
-/+ aws_instance.stage1
    ami:               "ami-a8d2d7ce" => "ami-a8d2d7ce"
    ...
    key_name:          "" => "terraform-test-key" (forces new resource)
    ...
Plan: 1 to add, 0 to change, 1 to destroy.
So go ahead and apply the configuration.
After Terraform is finished you can access your instance via SSH.
Note that the public id will change between recreation of instances.
$ ssh -i terraform-test-key.pem  ubuntu@<PUBLIC IP>
Welcome to Ubuntu 16.04.2 LTS (GNU/Linux 4.4.0-1013-aws x86_64)
...
Find the Gist for this at https://gist.github.com/koenighotze/28eb1930148d8bc5192495e5e790e380.
Provision the instance
Provisioners are used to bootstrap resources, apply configurations and so on. The follow-up post will show this using Ansible. For now, we’ll use a rather simple file and inline example.
Now we need to install the LAMP stack.
resource "aws_instance" "stage1" {
  # ...
  provisioner "remote-exec" {
    inline = [
      "sudo apt update",
      "sudo apt -q -y upgrade",
      "DEBIAN_FRONTEND=noninteractive sudo -E apt install -q -y lamp-server^",
      "cd /mnt/web208/a1/87/511967387/htdocs/STRATO-apps/wordpress_02/app/",
      "sudo mv index.html index.html.backup",
      "sudo echo 'Hello World' | sudo tee index.html"
    ]
    connection {
      timeout = "5m"
      user = "ubuntu"
    }
  }
  # ...
}
Without going into the details, we basically install a LAMP stack and modify the index.html.
But, if you execute terraform plan it will tell you, that nothing has changed?
$ terraform plan
...
This means that Terraform did not detect any differences between your
configuration and real physical resources that exist. As a result, Terraform
doesn't need to do anything.
This is due to the reason, that Terraform will only apply provisioners upon creation of a resource. So we first need to destroy and recreate the resource.
$ terraform destroy
$ terraform apply
…and it fails.
...
Error applying plan:
1 error(s) occurred:
* aws_instance.stage1: 1 error(s) occurred:
* timeout
Terraform does not automatically rollback in the face of errors.
Instead, your Terraform state file has been partially updated with
any resources that successfully completed. Please address the error
above and apply again to incrementally change your infrastructure.
If you run it with debug enabled TF_LOG=INFO terraform apply or if you logon via SSH and try the first command yourself sudo apt update you will notice a timeout at
ubuntu@ip-172-31-19-15:~$ sudo apt update
0% [Connecting to eu-west-1.ec2.archive.ubuntu.com (54.217.155.209)] [Connecting to security.ubuntu.com (91.189.88.149)]
In AWS each created EC2 instance has a security rule that allows outgoing network connections. Terraform per default deletes that rule. So we need to add that rule ourself.
resource "aws_security_group" "sec-group" {
  # ...
  egress {
    from_port = 0
    to_port = 0
    protocol = "-1"
    cidr_blocks = ["0.0.0.0/0"]
  }
  # ...
}
So apply the configuration yet again. And then point your browser to the public ip and you should see the following:
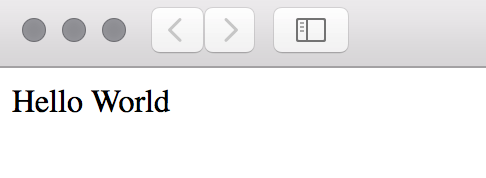
Wow! You should be impressed 😉
You can find the complete example at https://gist.github.com/koenighotze/362a0903d0121a4ce7e71b6fdd84cac8
What is next?
This post just covered some basics. The next part will explore a more complex example, that will resemble something
you would do in the real world.
Furthermore, we’ll compare Terraform to its contenders like Chef, Puppet etc.
If you want to know more, obviously, there is a book: Terraform up and running. This is highly recommended, although the official documentation is top-notch.
You should be aware that Terraform is still in a 0.x version, so things may still break.
In summary, Terraform helps you with building your infrastructure reproducibly and safely. Everything can be audited, versioned, checked. Typical configuration drift scenarios can be avoided.
Terraform is not a silver bullet. You will need other tools, such as Ansible for configuration management and Consul for managing state.
The IaC-space is crowded and in constant shift. The only way to find the best tool for your case, is to try things out.